Monday, 24 April 2017

SAP OTC Process: BAPI Sales Order Create Extension - Part 2

In Part 1 of SAP OTC Process, I discussed a demonstration for Creating Quotations with Extensions. In this part I am going to create Sales orders with customer extensions.

The process which i used is the same as in the Part 1, however there are certain considerations and customization which need to be considered for creating sales order based on customer requirements. In a usual process Sales Orders are created in response to a quotation.

Step 1:

Same structures are adjusted for the custom fields as i did in Part 1 and they are:
  • VBAPKOZ
  • VBAPKOZX
  • BAPE_VBAP
  • BAPE_VBAPX
  • VBAPKOM
  • VBAPKOMX
SD (Sales and Distribution), SAP All Module, Tutorial and Certification, SAP Live, SAP Material

Step 2:

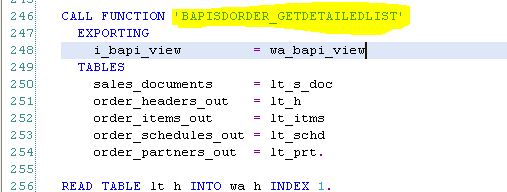
After adding custom fields , next we need to fill up the required tables using the function module BAPISDORDER_GETDETAILEDLIST/

SD (Sales and Distribution), SAP All Module, Tutorial and Certification, SAP Live, SAP Material

Step 3: 

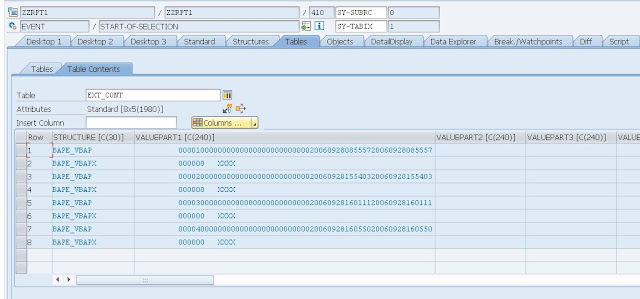
Next is again filling up the extension Container as discussed previously.

SD (Sales and Distribution), SAP All Module, Tutorial and Certification, SAP Live, SAP Material

Step 4:

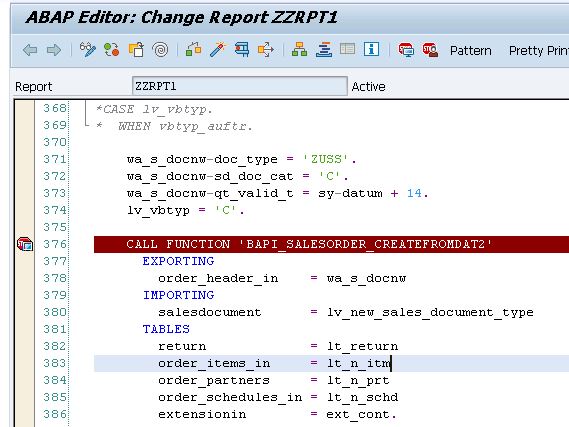
Now the function module Call for creating the sales order is will be done:

SD (Sales and Distribution), SAP All Module, Tutorial and Certification, SAP Live, SAP Material

Step 5: 

Check if we get values in lv_new_sales_document_type and in ext_cont for the custom fields.

SD (Sales and Distribution), SAP All Module, Tutorial and Certification, SAP Live, SAP Material

SD (Sales and Distribution), SAP All Module, Tutorial and Certification, SAP Live, SAP Material

SD (Sales and Distribution), SAP All Module, Tutorial and Certification, SAP Live, SAP Material

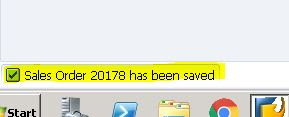
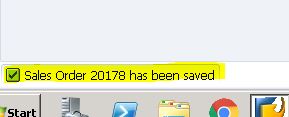
The function module has returned new Sales Order number as mentioned above, and ext container is filled with the custom field values .

STEP 6: 

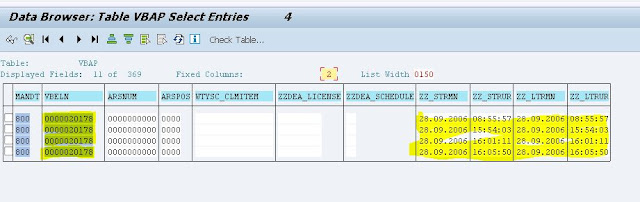
Now we check the VBAP table with new created sales order number to check if custom fields are updated.

SD (Sales and Distribution), SAP All Module, Tutorial and Certification, SAP Live, SAP Material

Saturday, 8 April 2017

SAP UI5 Table row color change based on status

I am going to write about an interesting topic in SAP UI5. Changing the entire row color of a sap.m.Table based on Status. Generally we keep a text in Status field and change the color of the text according to the Status. But, nowadays customers are asking about this requirement for better user experience.

SAPUI5, All SAP Modules, SAP Certifications

I am going describe you step by step to achieve this goal.

Step 1: Mock oData to display on the table

I am defining a method where I had created a mock data and take in a Name-model.

fnGetLeaveHistoryData:function(){
var oData={
LeaveHistory : [ {
"leaveFrom" : "8 Oct, 2016",
"leaveTo" : "11 Oct, 2016",
"leaveSubject" : "Casual Leave",
"Remarks" : "Casual Leave taken",
"status":"Pending"
},
{
"leaveFrom" : "1 Dec, 2016",
"leaveTo" : "2 Apr, 2016",
"leaveSubject" : "Sick Leave",
"Remarks" : "Sick Leave taken",
"status":"Approved"
},
{
"leaveFrom" : "12 Feb, 2017",
"leaveTo" : "14 Feb, 2017",
"leaveSubject" : "Casual Leave",
"Remarks" : "Casual Leave taken",
"status":"Rejected"
},
{
"leaveFrom" : "7 March, 2017",
"leaveTo" : "10 March, 2017",
"leaveSubject" : "LWP Leave",
"Remarks" : "LWP Leave taken",
"status":"Approved"
},
{
"leaveFrom" : "16 Apr, 2017",
"leaveTo" : "18 Apr, 2017",
"leaveSubject" : "Annual Leave",
"Remarks" : "Annual Leave taken",
"status":"Pending"
}]
};
var oLeaveHistoryJsonModel = new JSONModel(oData);
this.getView().setModel(oLeaveHistoryJsonModel,"LeaveModel");
},

Now the above data I am going to bind with sap.m.Table. I am gone a change the color of the row based on the status. If status is Pending, row color should be Orange, if Rejected, row color should be Red, & if Approved, row color should be Green.

Step 2: sap.m.Table data binding

<Table id="LeaveDetailsTable" showSeparators="All" class="sapUiSizeCompact"     items="path:'LeaveModel>/LeaveHistory'}"> <columns>
 <Column width="7em" minScreenWidth="Tablet" demandPopin="true" hAlign="Center"  >
   <Text text="Leave From" />
 </Column>
 <Column width="7em" minScreenWidth="Tablet" demandPopin="true" hAlign="Center">
  <Text text="Leave Up To" />
 </Column>
 <Column width="8em" minScreenWidth="Tablet" demandPopin="true" hAlign="Center">
  <Text text="Leave Type"/>   
 </Column>
 <Column width="12em" minScreenWidth="Tablet" demandPopin="true" hAlign="Center">
  <Text text="Description"/>
 </Column>
 <Column width="7em" minScreenWidth="Tablet" demandPopin="true" hAlign="Center">
  <Text text="Status"/>
 </Column>
</columns>
<ColumnListItem id="clm" >
   <customData>
     <core:CustomData key="mydata" value="{LeaveModel>status}" writeToDom="true"></core:CustomData>
   </customData>
   <cells >
<Text text="{LeaveModel>leaveFrom}"  />
<Text text="{LeaveModel>leaveTo}" />
<Text text="{LeaveModel>leaveSubject}"/>
<Text text="{LeaveModel>Remarks}" />
<Text text="{LeaveModel>status}"/>
  </cells>
</ColumnListItem>
</Table>

Here i have done the data binding. Inside ColumnListItem I had taken a Custom Data and bind the Status as value. So, on run time for each row one customdata will generate. I am attaching the screen shot bellow. Inside data-mydata  will have the Status of that particular row.

SAPUI5, All SAP Modules, SAP Certifications

Then we need to write the css according to that to assign color.

Step 3: Need to add CSS to put color according to the status

tr[data-mydata="Pending"]{
  backgr
ound:   #ff9933!important;
}
tr[data-mydata="Rejected"]{
  background: #ff3333!important;
}

tr[data-mydata="Approved"]{
  background:  #33cc33!important;
}

Now all set.. here is the output:

SAPUI5, All SAP Modules, SAP Certifications

Thursday, 16 February 2017

SRM UI5 Add-on : SC Creation Important classes to remember

I am going to share some helpful information for SRM UI5 Add-on developers ( with ABAP knowledge ) about important classes that you need to remember while debugging any issues related to SC creation and also how these classes communicate with each other and their purpose in overcall SC creation.

SAP Supplier Relationship Management, SAPUI5, All SAP Modules

There are five important class involved.

/SRMNXP/CL_BO_DA_SHOPPING_CART:  this class is runtime class for SRMSHOPPING_CART OData service (responsible for entity types ShoppingcartItemCollection and ShoppingcarCollection) that is responsible for SC creation. So everything starts and end in this class. Data entered on the UI5 screen is passed to this class and also data that is to be displayed finally in the screen is passed back to this class. Inside most of the methods of the class the actual work is delegated to /SRMNXP/CL_TEMPORARY_CART and /SRMNXP/CL_INTL_PDO_SC.

/SRMNXP/CL_BO_DA_PDO_CART:  This class has same purpose as above class but is responsible for entity types SRMShoppingcartItemCollection and SRMShoppingcarCollection. This class comes into picture, if you are adding item to a SC which was already saved in database or when you click on item details or any other tab in the item details.

/SRMNXP/CL_TEMPORARY_CART:  This class manages the temporary cart until it is completely ordered or SAVE&CLOSE button is clicked or entire minicart is deleted. This class communicates with class /SRMNXP/CL_BO_DA_SHOPPING_CART and /SRMNXP/CL_INTL_PDO_SC.

/SRMNXP/CL_INTL_PDO_SC: This class acts as an intermediate layer (I assume that is the reason for INTL in its name) between /SRMNXP/CL_TEMPORARY_CART and /SAPSRM/CL_PDO_BO_SC_ADV.

/SAPSRM/CL_PDO_BO_SC_ADV:  This is our old PDO friend that is responsible for creation of SC in SRM (this class existed since golden era of webdynpro in SRM 7.0).

SAP Supplier Relationship Management, SAPUI5, All SAP Modules

Saturday, 11 February 2017

MRP and Safety Stock in SAP PP

The SAP ERP system offers two types of safety stocks: absolute safety stock and safety days’ supply. The absolute safety stock enables the system to subtract it from material availability calculations (net requirements calculations). The safety stock must always be available to cover for unforeseen material shortages or unexpected high demand.

For days’ supply/safety time, the system plans the goods receipt in advance by the period specified as safety time. Thus, planned days’ supply of the stock, in fact, corresponds to the number of days specified as safety time. The system shifts backs the date of the receipts by the number of working days and also takes the factory calendar into account.

You make the relevant entries in the MRP 2 view of the material master. The system refers to the planning of a safety days’ supply as safety time. To consider the safety time, you need to set the Safety time ind. to “1” (for independent requirements) or “2” (for all requirements), and then also give the Safety time/act.cov. in days. Further, you can define deviations from the constant safety time using a safety time period profile (STime period profile field).

MAN Production Planning (PP), SAP PP, All SAP Modules

Let’s take a look at how the safety stock availability can be used in net requirements calculations and also the selection method that the system uses for receipts.

1. Safety Stock Availability


To avoid the unnecessary creation of planned orders for a smaller quantity, which can otherwise be covered by the safety stock, you can define the percentage (share) of safety stock that the system can use in such business scenarios. For example, during the MRP run, the system assesses a shortage of 2 PC of a material. You have, however, maintained a safety stock of 40 PC for this material, which the system doesn’t consider in the MRP run. If you define that a 10% safety stock can be used to account for smaller shortages, which for this example means that 4 PC come from safety stock, then the system can cater to this small requirement or shortage of 2 PC from the 4 PC available from safety stock and no longer creates a procurement proposal.

To define the safety stock parameters, use configuration (Transaction SPRO) menu path, Logistics > Production > Material Requirements Planning > Planning > MRP Calculation > Stocks > Define Safety Stock Availability. For this example, the system can consider 10% of the safety stock for Plnt 3000 and MRP group 0010 for net requirements calculation (see below). You eventually assign the MRP group in the MRP 1 view of the material master.

MAN Production Planning (PP), SAP PP, All SAP Modules

2. Master Data Selection


For material that’s produced in-house, you also create a BOM and routing (or master recipe). There might be several alternatives available for a BOM or a routing, so you can control the selection of alternatives. This ensures that the system is able to assign the relevant BOM and routing to the created planned orders, and it enables you to perform functions such as availability checks, and so on.

With the right control in place, the system automatically assigns the correct selection or alternate in the planned orders created from the planning run. This is accessed and managed in the MRP 4 view of the material master (Transaction MM02) as shown below.

MAN Production Planning (PP), SAP PP, All SAP Modules

Thursday, 29 December 2016

Enhancements in Web Dynpro ABAP-Part II

In part I , we have seen about enhancing the view and window of the standard web Dynpro ABAP component, in this Part we will be seeing about Enhancement of controller and deleting an Enhancement.

Enhancement of controller:


Enhancement of controller consist of enhancements of Context Nodes, Attributes, methods and actions.

Context Node Enhancement:


Each controller will be having the context assigned to it, Context nodes/attributes can be enhanced or new nodes/Attributes can be assigned to the context.

There will be two kinds of nodes,
  • Nodes without Dictionary structure mapping
  • Nodes with Dictionary structure mapping
IF the node is without DD mapping then you can add the attributes to it by right click on it -> create – > attribute.

Before to this step enable the enhancement implementation.

SAP UI  Web Dynpro ABAP, SAP Guides, SAP All Modules, SAP Tutorials and Materials, SAP Live, SAP Learning

SAP UI  Web Dynpro ABAP, SAP Guides, SAP All Modules, SAP Tutorials and Materials, SAP Live, SAP Learning

IF the node is with DD mapping then you can add the attributes to it by right click on it -> create using wizard- > attributes from components of structure. 

SAP UI  Web Dynpro ABAP, SAP Guides, SAP All Modules, SAP Tutorials and Materials, SAP Live, SAP Learning

Similarly you can add new nodes or attributes also to the same context by right click on the root context.

SAP UI  Web Dynpro ABAP, SAP Guides, SAP All Modules, SAP Tutorials and Materials, SAP Live, SAP Learning

Attribute Enhancement:


To enhance the attributes tab go to the required controller, and enable the enhancement implementation.

SAP UI  Web Dynpro ABAP, SAP Guides, SAP All Modules, SAP Tutorials and Materials, SAP Live, SAP Learning

Then the attributes tab will be enabled with Edit mode hence whatever the new additions are required or Existing attribute Edit( Except standard WD attribute) we can do here.

SAP UI  Web Dynpro ABAP, SAP Guides, SAP All Modules, SAP Tutorials and Materials, SAP Live, SAP Learning

Enhancements of method and actions:


There will be two possible things we can do in methods, Enhancing the existing method or adding new method

First enable enhancement implementation for the methods tab.

Then the tab will be converted into Edit mode hence we can add new methods here like normal Edit.

Enhancement of the existing methods can be done in any of the following 3 ways.
  • Pre Exit
  • Post Exit
  • Overwrite Exit
SAP UI  Web Dynpro ABAP, SAP Guides, SAP All Modules, SAP Tutorials and Materials, SAP Live, SAP Learning

We are not going to change the code of the existing method, instead we will select the Exit option & a new method will be created there we can write our business logic’s.

Pre Exit:


This method will be called before the execution of actual method, this will be called by wd_this reference by the controller and later actual method will be called.

Post Exit:


This is just an opposite of Pre Exit, this method will be called after the execution of actual method with wd_this reference by the controller.

Overwrite Exit:


Overwrite method will replace the execution of actual method hence in this case actual method will not even get called.

Similarly if you wants to delete the newly created methods you can use the delete options which will be available just above to the methods.

SAP UI  Web Dynpro ABAP, SAP Guides, SAP All Modules, SAP Tutorials and Materials, SAP Live, SAP Learning

Deleting Enhancement Implementation


To delete the Enhancement implementation, follow these steps
  • Go to transaction SE80
  • Select the package which you have saved the Enhancement object
  • Select the implementation and delete it like it showed here.
SAP UI  Web Dynpro ABAP, SAP Guides, SAP All Modules, SAP Tutorials and Materials, SAP Live, SAP Learning

SAP UI  Web Dynpro ABAP, SAP Guides, SAP All Modules, SAP Tutorials and Materials, SAP Live, SAP Learning

Tuesday, 27 December 2016

MM-FI integration: Account determination simulator

MM-FI integration: A conceptual understanding


Now we know how MM and FI are integrated and how the account determination happens. If we want to test inventory account determination, neither you need to do actual material posting in the system nor go through master data and customization to identify the accounts. SAP has delivered account determination simulation tool.

This helps to find how an account is determined while posting stock related transactions. We just need to input plant, material, movement type and select the transaction we would like to check say GR for purchase order, GR for process order etc. Based on above inputs, system would read customization, master data and simulate the account determination process. Apart from above, system would also identify missing account assignments for a given transaction. This would further help to analyze issues in an easy manner.

Go to T-code OMWB and close the initial popup. Click on Simulation button.

SAP MM FI, SAP Module, SAP All Modules, SAP Live, SAP Guides

Fill in plant, material , movement type and enter. Transaction list would be automatically refreshed based on the movement type. Double click on required type of transaction to be checked say GR and click on Account assignments.

SAP MM FI, SAP Module, SAP All Modules, SAP Live, SAP Guides

In next screen, we can see the list of all available transactions possible for this movement type, plant and material combination. Some fields like material type, valuation class etc. are derived from material master data. Some fields like valuation area, valuation grouping code etc. are derived from customization of the plant.

SAP MM FI, SAP Module, SAP All Modules, SAP Live, SAP Guides

In this screen, we can see what all accounts are determined for different kind of transactions.

EG: For Inventory posting, you can see Debit/Credit posting keys and respective G/L accounts. If there are any missing account assignment for a given transaction, this is also highlighted with text as “Missing”.

In above example, you can see this happened for Purchase account and purchase offsetting account. We don’t have any account assignments here as we are not using this scenario. By this way, we can clearly identify the gaps in account assignment without even doing the actual posting.

We can change to different movement types and transaction combinations and see how account determination happens and based on what fields it happens. You can try this in your system for various permutations and combinations.

Second feature available with this tool is, to check the MM-FI integration: Account determination simulator. This would help to identify any conflicts in screen layout rules for the inventory G/L account item during material document posting.

Screen layout for the inventory account item is determined at two levels.

1. From field status group of movement type
2. From field status group of inventory G/L account.

Click on “Check screen layout” button. In Next screen, we can see what is the field status set at movement type level and G/L account level. We should ensure that, there is no conflict between these two field status exist.

EG: We can’t have a field mandatory in one FSG and suppressed in other FSG. Posting would fail in such cases.

Sample output:

SAP MM FI, SAP Module, SAP All Modules, SAP Live, SAP Guides

Just hover on the small ICON to see if a field is Mandatory/Optional/Suppressed/Display only. Any conflicts found should get reported in the error log in tool bar.

In case of conflicts, priority would be given in the sequence below with the exception of Required and suppressed combination which is not allowed.

1. Suppressed
2. Display
3. Required
4. Optional

Third option provided by this tool is, “where used list of G/Ls”. This would help to Identify in what all scenarios a G/L has been configured in the system.

From the main screen of OMWB, click on where used list of G/L.

SAP MM FI, SAP Module, SAP All Modules, SAP Live, SAP Guides

Enter company code and valuation area in next screen and execute.

Sample output:

This output shows the list of valuation classes and transaction keys a G/L has been assigned to.

SAP MM FI, SAP Module, SAP All Modules, SAP Live, SAP Guides

Hierarchy is as below.

Chart of accounts

                |-G/L account

                                |-Valuation class

                                                |-Transaction event key

                                                                |-Account grouping code

Saturday, 26 November 2016

Automatic Account Determination

Inventory Management


Simply explanation: Managing the stock of material on qty and value basis is known as Inventory Management.

Whether Inventory is required or not for the material is controlled at material type and valuation area (plant) level.

In OMS2, Configuration required for each material type qty and value updating at valuation area level.

Case 1: If both Qty and Value update indicators are selected then PO can be raise for stock purpose and at GR material can be placed in store on qty basis and this Qty means stock value will be updated in inventory or stock G/L account.

Case 2: If qty update selected and value update not selected for material type at valuation area level, These material type related materials must procure for consumption Purpose. Means you should select account assignment category in PR and PO. At GR, received material is placed in store on qty basis but material value will be booked in relevant consumption G/L account but not in stock or inventory g/l account.

Inventory Management scenario’s can be defined as 1) Goods Receipt 2) Goods Issue 3) Stock Transfer 4)Transfer Posting

Characteristics of Goods Movements:


1) At least one material document will be generated and if goods movement is relevant to FI then accounting document to be generate.

2) Stock and Stock Value and Consumption Value may increase or decrease based on the goods movement.

3) If GR is entered against PO then PO history to be updated in Display PO.

4) Total value and Total stock, Moving average price to be updated (may be increase or decrease) in Material Master.

5) If Quality Management views are maintained with required fields, then when you completed the GR or GI, inspection lot to be generated when you run in QA32 , Based on Usage decision stock to be accepted or Rejected.

Sample process for Goods Receipt, Goods Issue, Stock Transfer, Transfer Posting.

Goods Receipts: 1) GR w.r.t Po for raw material

                               2) GR w.r.t Production order for finished Product.

                               3) GR With out for Production order

                               4) GR with out Purchase Order.

Goods Issue:      1) GI w.r.t Production order for raw material.

                              2) GI w.r.t sales order for finished product

                              3) GI to cost center or to plant maintenance.

                              4) GI to Scrap.

Stock Transfer:   1) Plant to plant stock transfer with in the company code.

                                2)From plant to plant across company code.

                                3)Store to Store stock transfer

Transfer Posting:  1) Unrestricted ⟺ QI ⟺ Blocked

Account Determination: (MM & FI Integration)

With this account determination Configuration settings,system will determine a suitable G/L account while posting GR (or) GI etc.

1) Account Determination with out wizard

I explained simply in one diagram, it is use full to remember the Process. Below I explained step by step.

SAP Learning, SAP Module, SAP All Modules, SAP Live, SAP Guides, SAP Certifications, SAP All Modules List, SAP Materials

1st Part:


Chart of account includes G/L accounts. This chart of account to be assigned to one company code or multiple company codes.

SAP Learning, SAP Module, SAP All Modules, SAP Live, SAP Guides, SAP Certifications, SAP All Modules List, SAP Materials

Note: Similar account determination required plants are grouped together and assigned to a valuation grouping code and then account determination will be configured at valuation grouping code level.

Step 1: Define Valuation Control (OMWM)

SAP Learning, SAP Module, SAP All Modules, SAP Live, SAP Guides, SAP Certifications, SAP All Modules List, SAP Materials

Here need to activate valuation grouping code.

For account determination, you can group together valuation area by activating the valuation grouping code.

Step 2: Group together valuation area.(OMWD)

SAP Learning, SAP Module, SAP All Modules, SAP Live, SAP Guides, SAP Certifications, SAP All Modules List, SAP Materials

here you assigned the valuation grouping code with combination of company code and chart of account and valuation area (plant) combination. If suppose similar account determination required plants are grouped together , here you can assign same valuation grouping code to multiple plants (or) multiple valuation areas.

2nd Part:


Material type and Account category reference and Valuation class.

Step 3: Define Valuation Classes.(OMSK)

In this step, you define which valuation classes are allowed for a material type.

SAP Learning, SAP Module, SAP All Modules, SAP Live, SAP Guides, SAP Certifications, SAP All Modules List, SAP Materials

So I am not going to this detailed. As account category reference is main controller and Mediator for material type and valuation class.

SAP Learning, SAP Module, SAP All Modules, SAP Live, SAP Guides, SAP Certifications, SAP All Modules List, SAP Materials

SAP Learning, SAP Module, SAP All Modules, SAP Live, SAP Guides, SAP Certifications, SAP All Modules List, SAP Materials

SAP Learning, SAP Module, SAP All Modules, SAP Live, SAP Guides, SAP Certifications, SAP All Modules List, SAP Materials

SAP Learning, SAP Module, SAP All Modules, SAP Live, SAP Guides, SAP Certifications, SAP All Modules List, SAP Materials

There is no direct configuration between material type and valuation class. Account category elaborates which material types related materials can be choose the which valuation classes.

You should enter this valuation class in material master.

3rd Part:


SAP Learning, SAP Module, SAP All Modules, SAP Live, SAP Guides, SAP Certifications, SAP All Modules List, SAP Materials

Step 4: Define Account Grouping for Movement types (OMWN)

Note: It is not possible to define new valuation string and new transaction event keys but account modifiers are editable with any movement type, for GBB or PRD or KON transaction keys are triggering then only account modifier also triggers.

Based on movement type system is triggering a valuation string and this valuation string is again triggers several transaction keys. but few transaction keys again triggers account modifiers or account grouping code also.

Below are the transaction event keys relevant account modifiers

GBB ⇨ BSA,INV,VBO,VBR,VNG,ZOB

PRD  ⇨ PRA,PRE,PRU

KON ⇨ PIP

Step 5: Configure Automatic Postings (OBYC)

SAP Learning, SAP Module, SAP All Modules, SAP Live, SAP Guides, SAP Certifications, SAP All Modules List, SAP Materials

SAP Learning, SAP Module, SAP All Modules, SAP Live, SAP Guides, SAP Certifications, SAP All Modules List, SAP Materials

SAP Learning, SAP Module, SAP All Modules, SAP Live, SAP Guides, SAP Certifications, SAP All Modules List, SAP Materials

In this step, you enter the system settings for inventory management and invoice verification transactions for automatic postings to G/L account.