Friday, 12 August 2016

Workflow in SRM User Interface Add-On 1.0

This blog provides insights about workflow in SRM Shopping Cart UI Add-On, draws parallel with Webdynpro and talks about how different workflow scenarios are incorporated.

To begin with SRM SC UI Add-On supports both AC and PC workflows. There is no additional configuration required. The existing configuration data is read and approver or approval chain is determined.You can also add adhoc approvers and reviewers. Let us take a look at what’s in store for workflow scenarios in SRM UI Add-On.

Approval preview:


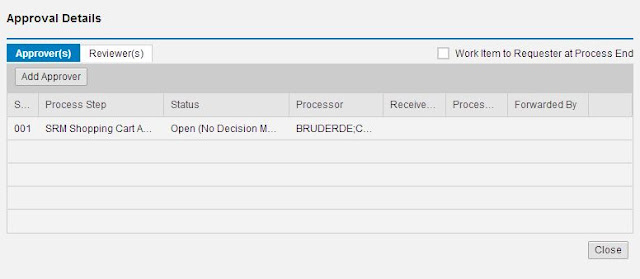
The approval preview has a different look and feel as shown below:

SAP Supplier Relationship Management, All SAP Modules, SAP UI

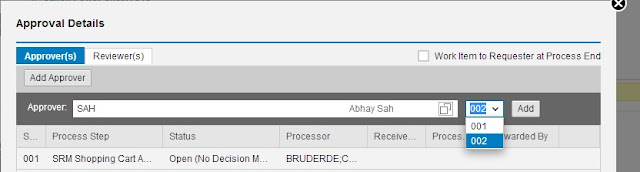
Clicking on ‘Add approver’ will open up the following row where you can search for approver via first name, last name or user ID:

SAP Supplier Relationship Management, All SAP Modules, SAP UI

Here if you have to add an adhoc approver above current level then you have to choose sequence number as ‘001’ from the drop down; if you want to add approver after current level then you choose sequence number as ‘002’ from the drop down and then click on add to add adhoc approver.

In AC workflow, you can also replace existing approvers.

Workflow scenarios:


  • Recall scenario:

Once a shopping cart is ordered, you can edit and recall an awaiting approval cart as shown below:

SAP Supplier Relationship Management, All SAP Modules, SAP UI

We do not have ‘show my task’ button in UI addon, but we open an awaiting approval cart directly in edit mode from ‘my carts’ tab when user has recalled that cart and has a valid revision workitem associated with it. This holds good for AC and PC workflow.

PC workflow:

Changed data in carts with PC workflow is saved by using enter key and user can add new items to the cart.

AC workflow:

User has to click on save in order to save changed data and thereby cart will switch to display mode You cannot add new items after recalling an AC workflow cart.
  • Inquire scenario:
User can open accept/adjust workitem from Suite Inbox and UWL. You can accept the decision or edit the cart. This holds good only if cart is created from SRM UI Add-On.

SAP Supplier Relationship Management, All SAP Modules, SAP UI

UWL configuration:


Please refer note 1892681 to set up UWL for UI Add-On. This configuration is only for employee user. Employee can access Accept/Adjust and Revision workitems from UWL via UI Addon if shopping cart is created in UI Addon. Alternately you can also use Suite Inbox in order to access these workitems.

Friday, 29 July 2016

Steps for opening and closing period – MM FI CO

As many of us struggle with changing periods in our DEV and QA environments, here is quick reference for opening and closing period. In doubt, please consult with your FI/CO expert.

There can be upto four transaction involved depending on your situation.

◉ MMRV – Allow posting to previous period
◉ MMPV – Close Periods
◉ OB52 – Change view “Posting Periods: Specify Time Intervals”: Overview
◉ OKP1 – Maintain Period Lock

1. MMRV: View current period / Allow posting to previous period


This transaction allows you to view current period and change setting for posting to previous period.

All SAP Modules, SAP MM, SAP FI, SAP CO, SAP ERP, MM (Materials Management)

All SAP Modules, SAP MM, SAP FI, SAP CO, SAP ERP, MM (Materials Management)

2. MMPV: Close Periods


In MMPV you can execute period closing up to the end of the current fiscal year. The period closing program updates the administration record, thus ensuring that the stock data of the material master are updated.

If, for example, you want to close your periods up to 03/2013, you are not allowed to post values in 01/2013. Therefore, if you still want to make postings in period t, you should execute period closing only for a maximum of t+1 periods.

All SAP Modules, SAP MM, SAP FI, SAP CO, SAP ERP, MM (Materials Management)

3. OB52: Change view “Posting Periods: Specify Time Intervals”: Overview


In this activity, you close the posting periods for FI-AA and open the new periods for FI-AA.

No more FI-AA postings can be made to the previous period. Postings for the future periods are allowed.

All SAP Modules, SAP MM, SAP FI, SAP CO, SAP ERP, MM (Materials Management)

4. OKP1: Maintain Period Lock


If needed, unlock period for CO transaction.

All SAP Modules, SAP MM, SAP FI, SAP CO, SAP ERP, MM (Materials Management)

If I have missed anything here or misinterpreted, let me know and I will correct it or add additional clarification/tips.

Monday, 11 July 2016

SAP BO Webi report development on HANA views

SAP BO Webi report development on HANA views:


This document explains step by step creation of Hana views, Universe in IDT and development of Webi report on top of the Hana views universes. This document will give understanding of the complete development/creation of end to end scenario from Hana views to report.

In this scenario we are considering Purchase application flow and analysis of report for purchase users assuming that Purchase related data extracted thru SLT from ECC system.

Applications & Versions used for this scenario:


SAP Hana Studio 2.0.7

Information Design Tool 4.1

SAP BO Webi 4.1

This Document explains below major topics:

1. Creation of Attribute View
2. Creation of Analytical View
3. Creation of calculation View
4. Creating and Publishing universe using IDT (Information Design Tool)
5. Creation of Webi Report

Extracted Purchase order header, Item and account assignment tables and also Material, Vendor, Company code and G/L account master data tables in to HANA from ECC using  SLT.

As a best practice need to follow the proper naming conventions for creating any views. (ex: Attribute view –starting with AT followed by table name)

1. Creation of Attribute View:


1.1. Select the respective package –>  Right click –->  New a Select Attribute View

SAP BusinessObjects Business Intelligence platform, SAP Live, SAP Tutorial and Material and Certifications, SAP HANA, SAP Guides, SAP HANA Live

SAP BusinessObjects Business Intelligence platform, SAP Live, SAP Tutorial and Material and Certifications, SAP HANA, SAP Guides, SAP HANA Live

1.2. Select the Mara table from the schema and drop it in Data Foundation in view and double click on the selected fields for output display.

SAP BusinessObjects Business Intelligence platform, SAP Live, SAP Tutorial and Material and Certifications, SAP HANA, SAP Guides, SAP HANA Live

Save and activate the view. Attribute view AT_MARA created on Material Master data table – Mara:

Similar way creates other attribute views and by selecting the respective master data tables from the schema, and enable the fields which we want to see in output in each view for below.

Vendor Master – LFA1 – Attribute View

Material Master – MARA – Attribute View

Company Code master – T001 – Attribute View

G/L Account master – SKB1 – Attribute view

Once all attribute views are created it displays as below:

SAP BusinessObjects Business Intelligence platform, SAP Live, SAP Tutorial and Material and Certifications, SAP HANA, SAP Guides, SAP HANA Live

2. Creation of Analytical View:


Below Purchase order tables are from ECC thru SLT.

EKKO : Purchase Document Header

EKPO : Purchase order Item

EKKN : Purchase Data (Account Assignment)

2.1. Right click on your package — Select New – Analytical View:

SAP BusinessObjects Business Intelligence platform, SAP Live, SAP Tutorial and Material and Certifications, SAP HANA, SAP Guides, SAP HANA Live

Enter the details

SAP BusinessObjects Business Intelligence platform, SAP Live, SAP Tutorial and Material and Certifications, SAP HANA, SAP Guides, SAP HANA Live

2.2. Drag the EKKO table in to data foundation and AT_LFA1 and AT_T001 attribute views in to star join.

SAP BusinessObjects Business Intelligence platform, SAP Live, SAP Tutorial and Material and Certifications, SAP HANA, SAP Guides, SAP HANA Live

Join the appropriate fields of EKKO table with both attribute views based on the requirements.

EKKO.company_code = AT_T001.Company_Code

EKKO.vendor = AT_LFA1.Vendor

SAP BusinessObjects Business Intelligence platform, SAP Live, SAP Tutorial and Material and Certifications, SAP HANA, SAP Guides, SAP HANA Live

2.3. In Semantics keep the Key fields, correct the Attributes and measures if required.

SAP BusinessObjects Business Intelligence platform, SAP Live, SAP Tutorial and Material and Certifications, SAP HANA, SAP Guides, SAP HANA Live

Save and activate the view.

Similarly create the other two Analytical views, all three analytical views will displays as below:

SAP BusinessObjects Business Intelligence platform, SAP Live, SAP Tutorial and Material and Certifications, SAP HANA, SAP Guides, SAP HANA Live

3. Creation of Calculation View:


3.1.  Right click on your package — Select New – Calculation View:

SAP BusinessObjects Business Intelligence platform, SAP Live, SAP Tutorial and Material and Certifications, SAP HANA, SAP Guides, SAP HANA Live

SAP BusinessObjects Business Intelligence platform, SAP Live, SAP Tutorial and Material and Certifications, SAP HANA, SAP Guides, SAP HANA Live

Drag two Aggregation nodes and select AN_EKKO and AN_EKPO analytical views in each node respectively.

SAP BusinessObjects Business Intelligence platform, SAP Live, SAP Tutorial and Material and Certifications, SAP HANA, SAP Guides, SAP HANA Live

Select required output fields in each Analytical view

SAP BusinessObjects Business Intelligence platform, SAP Live, SAP Tutorial and Material and Certifications, SAP HANA, SAP Guides, SAP HANA Live

3.2. Connect the two aggregation nodes to Join Node and connect the related common fields.

SAP BusinessObjects Business Intelligence platform, SAP Live, SAP Tutorial and Material and Certifications, SAP HANA, SAP Guides, SAP HANA Live

Drag the Projection node and select required fields.

SAP BusinessObjects Business Intelligence platform, SAP Live, SAP Tutorial and Material and Certifications, SAP HANA, SAP Guides, SAP HANA Live

3.3 Select the key fields and adjust the dimensions and measures.

SAP BusinessObjects Business Intelligence platform, SAP Live, SAP Tutorial and Material and Certifications, SAP HANA, SAP Guides, SAP HANA Live

Save and activate the view.

SAP BusinessObjects Business Intelligence platform, SAP Live, SAP Tutorial and Material and Certifications, SAP HANA, SAP Guides, SAP HANA Live

Right click on the view and select Data Preview, we can see the data output of calculation view CL_Purchase

SAP BusinessObjects Business Intelligence platform, SAP Live, SAP Tutorial and Material and Certifications, SAP HANA, SAP Guides, SAP HANA Live

Now Calculation view is ready need to create universe to expose this data thru webi report.

4. Creating universe using IDT (Information Design Tool)


4.1.  Logon to IDT, In Repository Resources under the respective system expand right on Connections Node.

Select ‘Insert Relational Connection’

SAP BusinessObjects Business Intelligence platform, SAP Live, SAP Tutorial and Material and Certifications, SAP HANA, SAP Guides, SAP HANA Live

Enter the connection name:

SAP BusinessObjects Business Intelligence platform, SAP Live, SAP Tutorial and Material and Certifications, SAP HANA, SAP Guides, SAP HANA Live

Click on Next, and then select the database middle ware drivers under SAP node

SAP BusinessObjects Business Intelligence platform, SAP Live, SAP Tutorial and Material and Certifications, SAP HANA, SAP Guides, SAP HANA Live

Click on Next, and then enter the User name, password details of Hana system and click on Test connection button.

SAP BusinessObjects Business Intelligence platform, SAP Live, SAP Tutorial and Material and Certifications, SAP HANA, SAP Guides, SAP HANA Live

Then click on Finish, Now connection established to Hana system.

Expand the Connections node there we can find the new connection ‘Purchase_Flow’.

SAP BusinessObjects Business Intelligence platform, SAP Live, SAP Tutorial and Material and Certifications, SAP HANA, SAP Guides, SAP HANA Live

4.2. Create project ‘Purchase_Flow’ by clicking on File à Newà Project and enter the project name.

SAP BusinessObjects Business Intelligence platform, SAP Live, SAP Tutorial and Material and Certifications, SAP HANA, SAP Guides, SAP HANA Live

SAP BusinessObjects Business Intelligence platform, SAP Live, SAP Tutorial and Material and Certifications, SAP HANA, SAP Guides, SAP HANA Live

Click on Finish. New project ‘Purchase_Flow’ created in Local Projects node.

4.3. Now select Purchase_Flow connection, right click and click on ‘Create Relational Connection Shortcut’.

SAP BusinessObjects Business Intelligence platform, SAP Live, SAP Tutorial and Material and Certifications, SAP HANA, SAP Guides, SAP HANA Live

It will popup Select a Local Project window; select our ‘Purchase_Flow project.

Relational Connection connected to project as shown below:

SAP BusinessObjects Business Intelligence platform, SAP Live, SAP Tutorial and Material and Certifications, SAP HANA, SAP Guides, SAP HANA Live

Select Project à right click à select New Click on ‘Data Foundation’

SAP BusinessObjects Business Intelligence platform, SAP Live, SAP Tutorial and Material and Certifications, SAP HANA, SAP Guides, SAP HANA Live

Enter the name of Data Foundation

SAP BusinessObjects Business Intelligence platform, SAP Live, SAP Tutorial and Material and Certifications, SAP HANA, SAP Guides, SAP HANA Live

Select Multi Source Enabled as IDT will support.

SAP BusinessObjects Business Intelligence platform, SAP Live, SAP Tutorial and Material and Certifications, SAP HANA, SAP Guides, SAP HANA Live

Check for the user authentication details..

SAP BusinessObjects Business Intelligence platform, SAP Live, SAP Tutorial and Material and Certifications, SAP HANA, SAP Guides, SAP HANA Live

Click on Next and select the connection which was created earlier.

SAP BusinessObjects Business Intelligence platform, SAP Live, SAP Tutorial and Material and Certifications, SAP HANA, SAP Guides, SAP HANA Live

Click on Next, displays the connection parameters.

SAP BusinessObjects Business Intelligence platform, SAP Live, SAP Tutorial and Material and Certifications, SAP HANA, SAP Guides, SAP HANA Live

Click on Finish.

Open the Purchase_Flow_DF, expand the connection node, select _SYS_BIC  schema node where all Hana views columnar table will store. Select the CL_Purchase Calculation view table.

SAP BusinessObjects Business Intelligence platform, SAP Live, SAP Tutorial and Material and Certifications, SAP HANA, SAP Guides, SAP HANA Live

Save it.

4.4. Now create Business layer. Select Purchase_Flow project Right click à New à click on Business Layer.

It displays the below pop up screen

Select Relational Data Foundation and click on Next.

Enter the Name and click on Next

Select the respective data foundation and click on Finish. There is check box if system will create classes and objects, if you want to create on your own need to un check this.

Purchase_Flow_BL business layer created as below, review dimensions and measures change if required.

Select change the data type if necessary

Save the Business Layer. We can check the query output by clicking on Queries tab.

4.5. Click on Insert Query, it will add displays the classes and objects of Business layer

Drag and drop required fields to click on refresh to check the data in first instance.

Close the query.

4.6. To publish as universe Right click on Purchase_Flow_BL business layer à Publish à To a Repository

Click on Next

Click on Next

Click on Finish, Universe published successfully.

5. Creation of Webi Report :


Open BI Launch pad by entering the login credentials

Expand Application and select Web Intelligence

Click on New and select ‘Universe’ as data source.

Select our Universe from the list

Purcahse_Flow_BL universe will open in Query Panel as below:

Drag and drop required dimensions and measures in Result objects and if you want to filter any filed also.

Query filtered based on Vendor, Click on Run Query, pop up display to select Vendor to see the data.

Once required Vendors are selected click on Ok, report will display.

Change the Report Name as Purchase Data Flow Report

You can format the report with Refresh Date, page no, logo and chart as per requirement.
Monday, 20 June 2016

Enhancements in Web Dynpro ABAP- Part I

This document will help you to understand the concept of the Enhancement implementation in standard web Dynpro ABAP Component.

Basically there is no option to enhance the Web Dynpro ABAP component through BADI or User Exit, hence sap has provided a way to do that called “Enhancement Implementation”.

Using Enhancement Implementation we can do the following enhancements.
  • Enhancement of Component
    • Creating New view
    • Creating New window
    • Creating New Controller
    • Creating New Application
  • Enhancement of Window
    • Enhancing Embed views / Adding new views
    • Enhancing navigation link / Adding New links
  • Enhancement of View
    • Enhancing UI elements / Adding New UI elements
    • Enhancing Plugs / Adding New Plugs
  • Enhancement of Controller
    • Enhancing standard methods & Actions / Adding New methods & Actions
    • Enhancing standard Context / Adding New Context
    • Enhancing standard Attributes / Adding New Attributes
  • Deleting the Enhancement Implementation
And in this part we will be seeing about Enhancement of View and Window Controller.

Enhancement Implementation for View:


To create the enhancement implementation for view follow the steps.

1. Open the Web Dynpro Component using SE80.

2. Open the desired View to Enhance, in this given example I will take Standard Test component WDR_TEST_BG_BLEND.

SAP Module, SAP All Modules, SAP Tutorials and Materials, SAP UI Web Dynpro ABAP

3. Select the view and click on the Enhance button to enhance it and please provide Enhancement name in the next popup.

SAP Module, SAP All Modules, SAP Tutorials and Materials, SAP UI Web Dynpro ABAP

SAP Module, SAP All Modules, SAP Tutorials and Materials, SAP UI Web Dynpro ABAP

4. Now to view will be converted to Change mode as like this.

SAP Module, SAP All Modules, SAP Tutorials and Materials, SAP UI Web Dynpro ABAP

So now you will get an option to add new UI elements and remove the existing UI elements under the enhancement option that you have created.

Now I am going to add a new text view under the root container and give some text to that.

SAP Module, SAP All Modules, SAP Tutorials and Materials, SAP UI Web Dynpro ABAP

SAP Module, SAP All Modules, SAP Tutorials and Materials, SAP UI Web Dynpro ABAP

Save the changes and activate the whole component along with your enhancement implementation and run the application.

SAP Module, SAP All Modules, SAP Tutorials and Materials, SAP UI Web Dynpro ABAP

Enhancement implementation for Window:


Here we are going to see about enhancing the Window and adding the new view,

In this example I am going to create a new view and call that view inside another view using view container and enhancing the window controller.

Enhance the View 1 and add the view container (VC_MAIN) at last to bind another view.

SAP Module, SAP All Modules, SAP Tutorials and Materials, SAP UI Web Dynpro ABAP

To add new view into the standard web Dynpro abap component right click on the view and select the option create as enhancement.

SAP Module, SAP All Modules, SAP Tutorials and Materials, SAP UI Web Dynpro ABAP

Then it will be asking for the enhancement implementation, then select the implementation that we have created.

SAP Module, SAP All Modules, SAP Tutorials and Materials, SAP UI Web Dynpro ABAP

After the selection of enhancement it will be like the process of normal view creation.

SAP Module, SAP All Modules, SAP Tutorials and Materials, SAP UI Web Dynpro ABAP

SAP Module, SAP All Modules, SAP Tutorials and Materials, SAP UI Web Dynpro ABAP

Enhance the window using same enhancement implementation, and bind the view for view container that we created.

SAP Module, SAP All Modules, SAP Tutorials and Materials, SAP UI Web Dynpro ABAP

SAP Module, SAP All Modules, SAP Tutorials and Materials, SAP UI Web Dynpro ABAP

Activate the whole component along with the enhancement implementation and execute the application.

SAP Module, SAP All Modules, SAP Tutorials and Materials, SAP UI Web Dynpro ABAP