Thursday, 27 July 2017

Creating New Date Rules in SAP CRM

This blog explains the process for creating new date rules in SAP CRM.

To create a new date rule, you need to perform a series of configuration and development steps:

1. Open the Date Rule customizing screen by going into the IMG and following the menu path: Customer Relationship Management > Basic Functions > Date Management > Define Date Types, Duration Types and Date Rules.

2. In the dialog structure that appears, select Date Rules, and then click the New Entries button. The screen shown below appears.

SAP Customer Relationship Management, SAP CRM, SAP All Modules, SAP Modules

Enter a technical name for the rule such as “ZBOOKEX1”, and then enter a description such as “Book Example”.

4. Click Save, and you are prompted for a customizing request. If you don’t have an existing customizing request, you’ll create a new one; otherwise, you’ll select one for your work.

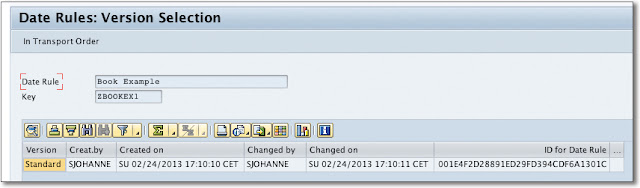
5. Go back to the overview screen of all existing date rules as shown below, select the date rule that you created, and then click the Details icon.

SAP Customer Relationship Management, SAP CRM, SAP All Modules, SAP Modules, SAP Tutorials and Materials

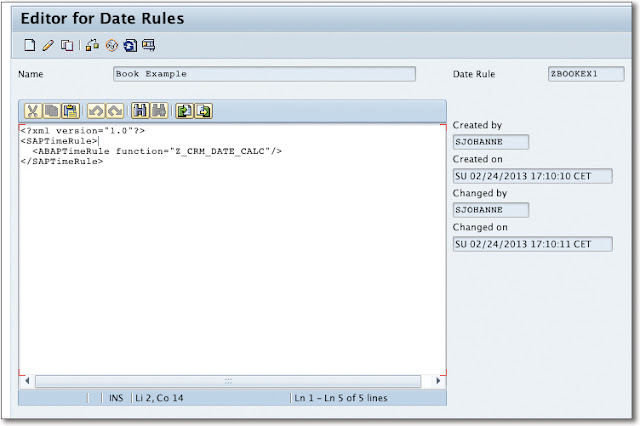
6. An overview screen appears showing all of the versions of the underlying XML that makes up the date rule as shown in the figure below. Double-click on the only row, and then you’re ready to start editing the XML of the date rule. There isn’t much documentation on this format, but to invoke an ABAP function module for date rules, you can enter a certain pattern as shown in the second figure and code below.

7. When you first open the editor, it will be in display mode. Click the Change button to insert the necessary XML code.

SAP Customer Relationship Management, SAP CRM, SAP All Modules, SAP Modules, SAP Tutorials and Materials

The Editor for Date Rules screen expects a certain pattern of XML to be entered that specifies the date rule as shown in the following code. The pattern has been derived by examining the delivered date rule in the system called “Planned Date (Activities)” with a technical key of “000000000002”.

<?xml version="1.0"?>

<SAPTimeRule>

  <ABAPTimeRule function="Z_CRM_DATE_CALC"/>

</SAPTimeRule>

SAP Customer Relationship Management, SAP CRM, SAP All Modules, SAP Modules, SAP Tutorials and Materials

8. After you’ve created the XML for the date rule that calls the ABAP function module you’ll create in the next step, save your work.

9. Before you can use this date rule in a date profile, you now must code the ABAP logic that will evaluate the date passed and return a result. Create a function module that has two importing parameters:
  • _ CONTEXT: A type reference to IF_TIMECONTEXT.
  • _ TIMEMESSAGE: A type reference to CL_TIMEMESSAGE.
Your function module also must return a reference value named ERROR that is of type XFLAG.

The context reference provides you access to the date data being manipulated in your function module. The interface allows you to retrieve the list of time events and then add back a special time event called the result, which is the result of your calculation and will populate the date type that will use this rule.

1 Function Module Logic: Date Context

To better understand this logic, let’s take a look at the following function module that calculates your date. The first call will be to get the event set from the context as shown in the code fragment:

li_eventset = context->get_eventset( ).

This is always needed to provide the result back and calculate any dates you may encounter.

Next you’ll get the GUID of the current transaction you’re processing so you can access any data needed for the calculation via the one order API. You’ll use the function module CRM_CONTEXT_GET_ACTUALGUID_OW to get this GUID.

After you have the GUID, you retrieve any other data from the business transaction using the one order OW function modules by passing in the header GUID. As you might have noticed, your function module doesn’t provide any data about the business transaction you’re working with directly.

If your calculation is based on another date, you first need to retrieve the value of that date by retrieving it from the event set. The following code fragment can be used to achieve this in your date rule function module:

li_tns_zfirstcont ?= li_eventset->get_by_name( lv_name ).

if li_tns_zfirstcont is initial.

  exit.

endif.

Note that you won’t want to process the date rule if the date you need to calculate hasn’t been entered or already calculated. Thus, you’ll exit the function module to prevent any short dumps with improper date calls.

One big difference of working with a date context as compared to standard ABAP time and date types is that you can’t perform simple add or subtract functions on the dates themselves. You instead need to create a duration that corresponds to how much you want to increment or decrement the date and then apply the duration to the date itself. To do this, create a new duration object using the class CL_TIMEDURA. You can then calculate the new date by using the static method CL_TIMECALC.

Wednesday, 12 July 2017

SAP MII connection to External HANA database

SAP MII (Manufacturing Integration and Intelligence) is a very powerful tool provided by SAP to connect shop floor systems (PLC / SCADA / Historians) to ERP (SAP ECC / SAP S/4 HANA). By such seamless integration between shop floor and ERP systems, it provides customers better visibility in terms of manufacturing production and it helps in reducing operational costs by providing various dashboards, KPI monitoring and visual representation of machine data. In today’s world where everyone is talking and researching about IoT and the massive amount of data that any manufacturing company is going to deal with, the expectation from the SAP MII customers is to handle huge volume of time-series and tabular data collected from operations/PLCs at the manufacturing plants to perform long-term trend and regression analysis on it near real time. Moreover, customers also want to predict and prevent operational issues such as machine downtimes, material quality and performance bottlenecks in production lines.

MII in its traditional architecture usually has its own Netweaver database and an external database (commonly known as Application Database) where most of transaction data and certain master data is stored. In this blog, we are solely going to concentrate on external application database that MII connects to. Before the birth of HANA database, MII generally had MS SQL or Oracle as its application database. But looking at the computing power of HANA database and its massively fast i/o operations, customers are demanding HANA as their external database that should connect to MII for all the transaction data and analytics.

There are many ways MII can connect to external HANA database but we are going to learn how to connect to HANA database using JDBC API. To install JDBC driver for HANA, please follow these two very detailed and informative blogs:

◉ Connect to SAP HANA via JDBC

Now once we have a confirmation that HANA database has JDBC driver installed and configured,we can perform belowsteps in MII to connect to HANA database.

1. Go to Data Sevices / Data Servers :


Tips & Tricks, SAP ERP Modules, SAP Online Guide, SAP HANA, SAP Certifications

2. Click on Create and below screen will be shown:


Tips & Tricks, SAP ERP Modules, SAP Online Guide, SAP HANA, SAP Certifications
  • Provide Server Name – Any meaningful name
  • Connector Type: IDBC (As we are going to use JDBC connection, connector type would be IDBC)
  • Description: Meaningful Description
  • Click on Finish

3. Provide Server Details and other information (Critical Step) :


a. Check “Enabled” & “Allow Dynamic Query” Checkboxes in Settings tab:

Tips & Tricks, SAP ERP Modules, SAP Online Guide, SAP HANA, SAP Certifications

b.Open Connection Tab:

Tips & Tricks, SAP ERP Modules, SAP Online Guide, SAP HANA, SAP Certifications
  • JDBC Driver: com.sap.db.jdbc.Driver
  • Server URL:
jdbc:sap://<server>:<port>[/?<options>] where <port> should be 3<instance number>15

Lets say Server name in MySERVER101.com & HANA Database instance is 01.Then Server URL would be: jdbc:sap://MySERVER101.com:30115/?autocommit=false
  • User Name: User Name of the HANA Database
  • Password: Password of the HANA Databse
  • Validation Query: Select ‘Hello World’ from Dummy
If we have provided all the correct information then if we go to Status tab, we can see ‘Running’ Status:

Tips & Tricks, SAP ERP Modules, SAP Online Guide, SAP HANA, SAP Certifications

4. Open MII Workbench, select New SQL Query and newly created data server External-HANA-DB will appear in Available Servers:


Tips & Tricks, SAP ERP Modules, SAP Online Guide, SAP HANA, SAP Certifications

5. We can see all the tables and can query them:


Tips & Tricks, SAP ERP Modules, SAP Online Guide, SAP HANA, SAP Certifications

Please note that by directly querying HANA database tables via MII SQL Query will not give us any benefits that HANA’s in-memory database management provides. Hence optimal way to perform this activity is to create tables in HANA as columnar tables and then define the Attribute views (fact tables), Analytic views (measure and dimensions) and Calculation views (complex calculations and data processing). Then MII SQL Query can directly query these views and can enjoy all of the HANA benefits.

Thursday, 15 June 2017

Connect to SAP HANA via JDBC

SAP HANA provides a driver that enables Java applications to connect to the SAP HANA database with the JDBC application programming interface (API).

 ◈  Procedure


1. Install the JDBC driver.

SAP HANA, JDBC, All SAP Modules

The driver (ngdbc.jar) is installed as part of the SAP HANA client installation and by default is located at:
  • C:\Program Files\sap\hdbclient\ on Microsoft Windows platforms
  • /usr/sap/hdbclient/ on Linux and UNIX platforms
2. Add ngdbc.jar to your classpath.

3. Write Java code to create a connection to the database and execute SQL commands. Use a connection string in the form of jdbc:sap://<server>:<port>[/?<options>]. For example:

jdbc:sap://myServer:30015/?autocommit=false

Specify one or more failover servers by adding additional hosts, as in the following example:

jdbc:sap://myServer:30015;failover1:30015;failover2:30015/?autocommit=false

To connect to a specific database, for example tdb1, use the databaseName parameter, as illustrated in the following code:

jdbc:sap://localhost:30013/?databaseName=tdb1&user=SYSTEM&password=manager

◈ Example


The following is an example of connecting to an SAP HANA server called myhdb, which was installed as instance 07, with user name myName and password mySecret. Make sure to change these for your system, and add the JDBC driver (ngdbc.jar) to your classpath.

import java.sql.*;
public class jdemo {
   public static void main(String[] argv) {
      Connection connection = null;
      try {          
         connection = DriverManager.getConnection(
            "jdbc:sap://myhdb:30715/?autocommit=false", "myName", "mySecret");          
      } catch (SQLException e) {
         System.err.println("Connection Failed:");
         System.err.println(e);
         return;
      }
      if (connection != null) {
         try {
            System.out.println("Connection to HANA successful!");
            Statement stmt = connection.createStatement();
            ResultSet resultSet = stmt.executeQuery("Select 'hello world' from dummy");
            resultSet.next();
            String hello = resultSet.getString(1);
            System.out.println(hello);
       } catch (SQLException e) {
          System.err.println("Query failed!");
       }
     }
   }
}

Saturday, 10 June 2017

SAP Lumira 2.0 Deployment Patterns

We’ve talked a lot in this blog series about the benefits of using SAP Lumira 2.0, but what are the specific deployment patterns to maximize business value?

Lets go through the patterns from simplest to most involved:

1. SAP Lumira, discovery component only.
2. SAP Lumira, designer component + SAP Lumira Server for BI Platform.
3. SAP Lumira, discovery and designer components + SAP Lumira Server for BI Platform.

SAP Lumira, discovery component only


SAP Lumira, SAP Module, SAP All Modules, SAP Guides, SAP Certifications, SAP Learning

In a Lumira 2.0 discovery only deployment, only the Lumira discovery tool is deployed to the desktop. Business analysts and casual users use this to:

◉ Access data sources like Excel, relational data like Oracle, IBM DB2, SAP HANA, or big data like Amazon Redshift, Apache Spark, or Cloudera Impala.
◉ Manipulate, cleanse, and join data from these datasets.
◉ Create visualizations, stories, and infographics.
◉ Share the resulting LUMX file with other users of Lumira 2.0 discovery via email.

The license that enables this deployment pattern is SAP Lumira, desktop edition.

Advantages


◉ Simple to deploy – a desktop install.
◉ Easy to get started, especially for small customers.

Drawbacks


◉ Each user requires a desktop install which can be cumbersome for a large user population.
◉ LUMX file sharing is done via email or file shares and is not governed.
◉ No ability to use the SAP BusinessObjects Universe for secured business user access to relational data via the SAP BusinessObjects BI Platform.
◉ No ability to access data sources that are defined and managed in the SAP BusinessObjects BI Platform.

SAP Lumira, designer component + SAP Lumira Server for BI Platform


SAP Lumira, SAP Module, SAP All Modules, SAP Guides, SAP Certifications, SAP Learning

In this deployment model, only Lumira designer is used to create sophisticated enterprise dashboards and analytic applications.

The workflow starts on the desktop with the SAP Lumira designer component where the dashboard developer starts by creating a template either from scratch, or by using one of the existing predefined templates.

The Lumira designer component is based on the Eclipse framework and is a developer-centric tool. We have customers that deploy this tool to power users that sit in the line of business, but they are typically well supported with predefined templates created by IT, and additional training.

I like to explain the designer component as similar to good old Microsoft Visual Basic. You drag and drop some visual components to the canvas, and wire them up using a scripting language, which in this case is a subset of Javascript instead of Basic.

Because this is a developer centric tool, it has more of a learning curve than SAP Lumira discovery. And that’s ok, because they are both based on the same common runtime engine, file format, and data access stack, and both are designed to work together.

Once users create the LUMX file using the designer component, it is published to the SAP BusinessObjects BI Platform where it can be secured and shared with large user populations.

All subsequent modification of the LUMX file must happen using the desktop software.

This is equivalent to the workflow used today by SAP BusinessObjects Dashboards customers, and SAP BusinessObjects Design Studio 1.x customers.

There are many licenses that enable this deployment pattern, but they would all include SAP BusinessObjects Dashboards or Xcelsius Enterprise.

Advantages


◉ Enables the creation of sophisticated dashboards and analytic applications.
◉ End user consumption of analytic applications are governed and secured by the SAP BusinessObjects BI Platform.
◉ Includes powerful out-of-the-box templates to help customer get started quickly.
◉ Enables sharing with thousands of end users via the SAP BusinessObjects BI Platform.
◉ The Lumira 2.0 applications are very interactive and enable features like end-user charting modification, minimizing the need to modify the templates using the designer component.
◉ Enables mobile consumption using online connectivity back to the BI Platform.

Drawbacks


◉ All LUMX file creation and modification has to be done using the designer component on the desktop.
◉ The designer component has a developer-centric look and feel which can create a steep learning curve for less technical users.
◉ Mobile access is all online – offline access to designer applications is not supported.
◉ Mashing up of multiple data sources is not supported without the discovery component.
◉ Server installation is required to enable scale and governance.
◉ Not intended for self-service data discovery.

SAP Lumira, discovery and designer components + SAP Lumira Server for BI Platform


SAP Lumira, SAP Module, SAP All Modules, SAP Guides, SAP Certifications, SAP Learning

In this deployment pattern, the full power of SAP Lumira is realized.

By combining the user friendliness of the discovery component with the scripting power of the designer component, customers can accelerate their dashboard projects. Business users rapidly prototype the look and feel of the dashboard first in the Lumira discovery component, and then IT or power users open those LUMX files in the designer component to add more interactivity via scripting.

Also, IT can endorse the usage of the discovery desktop client to enable more agility among the business user community.

LUMX files can be published to the SAP BusinessObjects BI Platform for governance and sharing from either the discovery or designer component.

Data mashups are supported via the discovery component, which can then be leveraged in the designer component.  After making modifications to the LUMX file in designer, that same file can be re-opened in discovery to refresh the offline data..

The licenses that enable this capability have been sold since 2012, starting with the BA&T BusinessObjects BI Suite, SAP BusinessObjects BI Suite, and the current SAP BusinessObjects Enterprise license (professional and premium editions only – not standard). SAP BusinessObjects Edge licenses sold since 2014 also include these licenses.

Legacy BusinessObjects Enterprise Premium licenses purchased prior to 2012 do NOT include this functionality.

Advantages


◉ Includes all the advantages of the prior 2 patterns plus…
◉ Business users can help rapidly prototype dashboards.
◉ Organically created visualizations can be easily promoted to enterprise grade analytic applications.
◉ Both business users and IT/power users can promote LUMX files to the SAP BusinessObjects BI Platform from either the discovery or designer component.
◉ The discovery component can be used to create data mashups that provide the data for analytic applications in the designer component.
◉ Most visualizations created with the discovery component support offline access in the SAP BusinessObjects Mobile app.
◉ The discovery component supports end-user access to relational data from the SAP BusinessObjects Universe.
◉ LUMX files created with the discovery component can be modified directly on the SAP BusinessObjects BI Platform without any need for desktop software.
◉ The SAP BusinessObjects BI Platform can be used to create a brand new Lumira document from scratch – but only against HANA online data sources. No need to use any desktop software.

Drawbacks


◉ Once a LUMX document is edited using the designer component, it cannot be edited in the discovery component. The LUMX file can be opened in discovery and viewed, and the offline data can be refreshed using discovery – however the visualizations and stories cannot be modified. This restriction is planned to be lifted in a future release.
◉ Server installation is required to enable scale and governance.

Wednesday, 31 May 2017

How Classify The Classes based on Percentage in SAP HANA

In this blog I am classifying the Student classes based on there percentage. If Student get above 60 percentage then they will get “FIRST CLASS” or If Student get between 60 to 50 percentage then they will get “SECOND CLASS” or If Student get below 50 percentage they will get “THIRD CLASS”.

For Implementing this scenario I took two calculated columns one for calculating Percentage other one for Specifying Class.

Below are the steps to implement “How Classify The Classes based on Percentage in SAP HANA”.

Step 1: Create one Table with the name “STUDENT_DETAILS” in our schema with following structure

All SAP Modules, SAP Tutorials and Materials, SAP HANA Studio, HANA Calculation View, SAP HANA Modeling

Insert Below Values into our Table

All SAP Modules, SAP Tutorials and Materials, SAP HANA Studio, HANA Calculation View, SAP HANA Modeling

Step 2: Create Calculation view in our package with the name “STUDENT_CLASS”

All SAP Modules, SAP Tutorials and Materials, SAP HANA Studio, HANA Calculation View, SAP HANA Modeling

Select STUDENT_DETAILS table in projection and Select the all columns.

All SAP Modules, SAP Tutorials and Materials, SAP HANA Studio, HANA Calculation View, SAP HANA Modeling

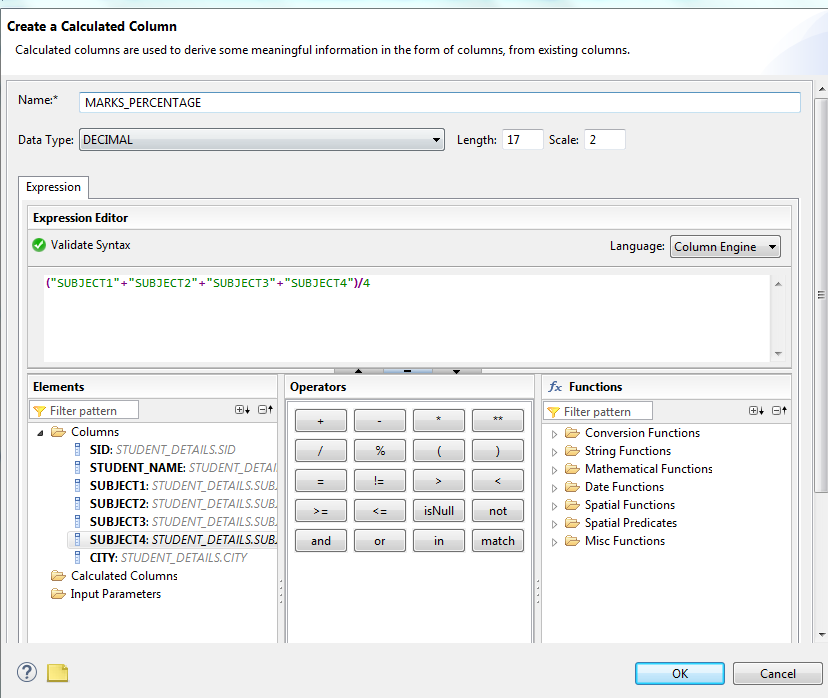
Create One calculated column for Calculating Percentage.

All SAP Modules, SAP Tutorials and Materials, SAP HANA Studio, HANA Calculation View, SAP HANA Modeling

Create another calculated column for calculated for class classification.

All SAP Modules, SAP Tutorials and Materials, SAP HANA Studio, HANA Calculation View, SAP HANA Modeling

Use the following logic to classifying the classes.

if(“MARKS_PERCENTAGE”>=60,‘FIRST CLASS’,if(“MARKS_PERCENTAGE”>=50 and “MARKS_PERCENTAGE”<60,‘SECOND CLASS’,if(“MARKS_PERCENTAGE”<50,‘THIRD CLASS’,‘FAIL’)))

Add projection to aggregation and select the calculated columns MARKS_PERCENTAGE and CLASS.

All SAP Modules, SAP Tutorials and Materials, SAP HANA Studio, HANA Calculation View, SAP HANA Modeling

Save and Activate the View.

select the data preview.

Output:


All SAP Modules, SAP Tutorials and Materials, SAP HANA Studio, HANA Calculation View, SAP HANA Modeling

Above output we can see the CLASSES Classification in last column.

Tuesday, 30 May 2017

Quick Test Data Generation in SAP BW

During development in BW, I’m sure many have come across the situation where we are lacking of test data for testing especially if it’s the source that provide the test data is a new development as well. To save time while waiting for the actual test data to be generated, there’s a program in SAP BW that can generate random test data directly into the underlying InfoCube(s) that is feeding your report or logic.

Following are 3 simple steps for quick test data generation so that you can test on the functionality (like variables, key figures, formula and etc) of your report while waiting for the actual test date.

Program Name: CUBE_SAMPLE_CREATE


Step 1: Go to SE38 and execute the above program


SAP Guides, SAP Module, SAP Tutorials and Materials, SAP All Certificaions

Step 2: Execute the program with the below info


InfoCube Entry
  • InfoCube Name: Technical name of your InfoCube, if it’s a SPO, remember to enter the technical of the underlying InfoCube and not the SPO Name (for example, SPO: ZABC01, the underlying InfoCube will be ZABC01XX)
  • Number of Data Records to be Generated: Provides the number of Test Data to be generated
  • Fiscal Variant: If you have Fiscal Period to be generated
SAP Guides, SAP Module, SAP Tutorials and Materials, SAP All Certificaions

Input Mode:
  • Generated Values: The program will Immediately generate and display the Test Data
  • Vals from Master Data Table: The program will generate and display the Test Data based on Master Data
  • Read-For-Input ALV: Personally I would recommend this approach as the program will generate the test data based on your preference
    • You can change the value of the table before hitting the save button to generate the test data into the target InfoCube
    • Tip: You can export this structure to excel, manually change all the test data, then copy and paste the values back to the ALV table
SAP Guides, SAP Module, SAP Tutorials and Materials, SAP All Certificaions

SAP Guides, SAP Module, SAP Tutorials and Materials, SAP All Certificaions

SAP Guides, SAP Module, SAP Tutorials and Materials, SAP All Certificaions

Step 3: Check the Target InfoCube


Result

Every time the Test Data Generation is executed, you will see a new request being created at your targeted InfoCube. You can always remove this request after your testing.

SAP Guides, SAP Module, SAP Tutorials and Materials, SAP All Certificaions

Saturday, 20 May 2017

SAP OTC Process: BAPI Quotation Create Extension - Part 1

SAP OTC (Order-to-Cash) process is the core process of SAP Sales and distribution module. SAP OTC process involves various steps. The first process is ‘ENQUIRY’ from the customers, then ‘QUOTATION’, next is the ‘SALES ORDER’ followed by ‘STANDARD ORDER’ , ‘SHIPPING’, ‘DELIVERY’ , ‘PICKING’ etc.

SAP BAPI (Business Application Programming Interfaces) are widely in SAP Environment for creating, updating and deleting business documents along with reading from the backend database as well. BAPIs are the API methods of SAP business object types, and stored in Business Objects Repository (BOR).

This blog discusses Extension for BAPIs which are part of OTC process. This document is part 1 of the SAP OTC Process extensions serious. Part 2 discusses Sales Order extension.

In Current blog , I am discussing Quotation extension scenario for BAPI_QUOTATION_CREATEFROMDATA2. As discussed earlier, QUOTATION is response to customer Inquiry.

Before we move on to the coding side. There are tables and structures, that must extended with the custom fields.

1) The first step is to add custom fields in the VBAP (Sales document Item level) . I am taking date and time fields, as part of the custom data as show in the below screen capture.

SAP Tutorials and Materials, SAP Certifications, SAP Modules, SAP Guides, SAP Learning, SAP SD

2) The next step is adjusting the following structures :

Adjust the following structures for customer enhancements to table VBAP:
  1. VBAPKOZ
  2. VBAPKOZX
  3. BAPE_VBAP
  4. BAPE_VBAPX
  5. VBAPKOM
  6. VBAPKOMX
SAP Tutorials and Materials, SAP Certifications, SAP Modules, SAP Guides, SAP Learning, SAP SD

SAP Tutorials and Materials, SAP Certifications, SAP Modules, SAP Guides, SAP Learning, SAP SD

SAP Tutorials and Materials, SAP Certifications, SAP Modules, SAP Guides, SAP Learning, SAP SD

Here , I have demonstrated adding custom fields in 3 out of 6 structures. Adjusting all structures are mandatory.

3) After adjusting required structures I move on to the coding part of BAPI API_QUOTATION_CREATEFROMDATA2 for the BAPI extension process.

(a) First we need to declare extension container to hold custom data as show below

SAP Tutorials and Materials, SAP Certifications, SAP Modules, SAP Guides, SAP Learning, SAP SD

This container needs to be filled and, then supplied at the ‘extensionin’ table for the BAPI_QUOTATION_CREATEFROMDATA2.

4) Now lets fill up some data using function module ‘BAPISDORDER_GETDETAILEDLIST‘ based on inquiry.

SAP Tutorials and Materials, SAP Certifications, SAP Modules, SAP Guides, SAP Learning, SAP SD

5) Schedule lines needs to be adjust for example transport planning date, Goods issue date ,scheduling lines date etc as show below.

SAP Tutorials and Materials, SAP Certifications, SAP Modules, SAP Guides, SAP Learning, SAP SD

6) For updating custom fields and creating quotations, i am using times and dates fields from table ‘AFVV‘ these fields need to be updating along with quotation creation as part of custom fields data. I am reading date and time fields and putting them in the internal table .

SAP Tutorials and Materials, SAP Certifications, SAP Modules, SAP Guides, SAP Learning, SAP SD

7) Next step is updating the extension container

SAP Tutorials and Materials, SAP Certifications, SAP Modules, SAP Guides, SAP Learning, SAP SD

8) Now we are ready to call the BAPI_QUOTATION_CREATEFROMDATA2 

SAP Tutorials and Materials, SAP Certifications, SAP Modules, SAP Guides, SAP Learning, SAP SD

9) I executed the program and check extension container.

SAP Tutorials and Materials, SAP Certifications, SAP Modules, SAP Guides, SAP Learning, SAP SD

extension container is ready ,

10) Now I have to check if I have the new quotation number in variable lv_new_sales_document_type

SAP Tutorials and Materials, SAP Certifications, SAP Modules, SAP Guides, SAP Learning, SAP SD

As you can see in the above screen capture, the BAPI returns the new quotation number indicating the successful execution of BAPI.

11) Finally I check the new quotation number in VBAP TABLE and check if custom fields are updated.

SAP Tutorials and Materials, SAP Certifications, SAP Modules, SAP Guides, SAP Learning, SAP SD

All the Custom fields are updated for the newly created Quotation.